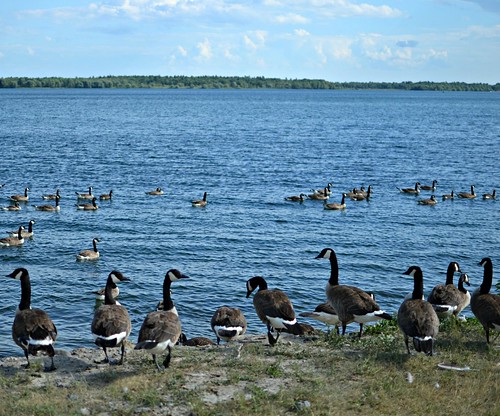
My partner and I had an eventful road trip from Toronto to Prince Edward Island—car trouble in the middle of a long weekend left us stranded in a sleepy town in southeastern Ontario for a few days. This was the beautiful scene where the alternator died (that's the St. Lawrence River, with New York across the water).

There are definitely worse places to be stranded than Morrisburg, which is scenic and quiet and a good place to have a spontaneous vacation for introverts. We rescued some books from the car and read for three days, broken up by walks along the seaway to hassle some dignified geese.
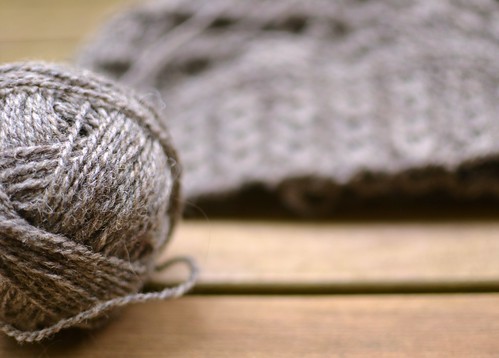
Once we got the car back the rest of the trip was uneventful, and since we arrived I have been sprawled languorously in a comfortable chair on a deck in the shade, knitting with my favourite PEI yarn, Macausland's 2-ply Medium. The spongy Merino DK from Belfast Mini-Mills and the luxury yarn from Fibre-Isle are close runners-up, but my heart belongs to crisp sturdy wool I can knit into fabric that will outlive me.

These mittens fell off my needles in an afternoon and evening, so I want to share them with you. They have ribbed cuffs (practical!) whose knit columns meander around one another over the backs of the hands (dense and warm!), eventually narrowing to a pointed tip (whimsy! ... I really can't get enough of mittens with pointed tips, and you could round these ones off if you'd like, by omitting the rounds without decreases toward the end of the tip shaping). If you can't get your hands on Macausland yarn you have my sympathy, and I suggest another woollen-spun heavy worsted like Briggs and Little Heritage.
Abbreviations
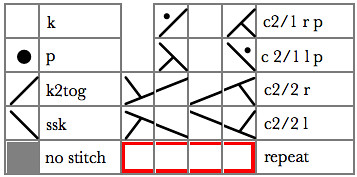
- c2/1 r p – two-over-one right purl cross: slip next stitch to a cable needle and hold to the back of the work; knit 2; purl the stitch from the cable needle
- c2/1 l p – two-over-one left purl cross: slip next 2 stitches to a cable needle and hold to the front of the work; purl 1; knit the 2 stitches from the cable needle
- c2/2 r – two-over-two right cross: slip next 2 stitches to a cable needle and hold to the back of the work; knit 2; knit the 2 stitches from the cable needle
- c2/2 l – two-over-two left cross: slip next 2 stitches to a cable needle and hold to the front of the work; knit 2; knit the 2 stitches from the cable needle
- est – established
- foll – follows
- k – knit
- k2tog – knit 2 together (one stitch decreased)
- M1L – make one leaning left: with the left needle and working from front to back, scoop up the strand between the most recently worked stitch and the next one; knit into the back of the picked-up strand, twisting it closed (one stitch increased)
- M1R – make one leaning right: with the left needle and working from back to front, scoop up the strand between the most recently worked stitch and the next one; knit into the front of the picked-up strand, twisting it closed (one stitch increased)
- no stitch – ignore this; it's a placeholder in the chart
- p – purl
- patt – pattern
- pm – place marker
- rem – remaining
- repeat – repeat the outlined stitches and rows as directed
- rnd – round
- sl – slip
- ssk – slip two stitches separately and knitwise, insert the left needle into both of them, and knit them together (one stitch decreased)
- st – stitch
Materials
- 1 skein Macausland's Woollen Mills 2-ply Medium (100% wool; 200 yards/183m per 126g skein): 1 skein in Navy
- 1 set of 5 US #6/4mm double-pointed needles, OR 32" circular needle for Magic Loop. Adjust needle size if necessary to obtain gauge.
- Stitch markers
- Tapestry needle
- Scrap yarn
Finished Size
7.5"/19 cm hand circumference, measured above the thumb. Hand length is adjustable.
Gauge
18 sts and 32 rnds = 4"/10 cm in stockinette stitch (knit every round), after blocking.
24-st-wide cabled panel should measure 3"/7.6 cm wide after blocking.
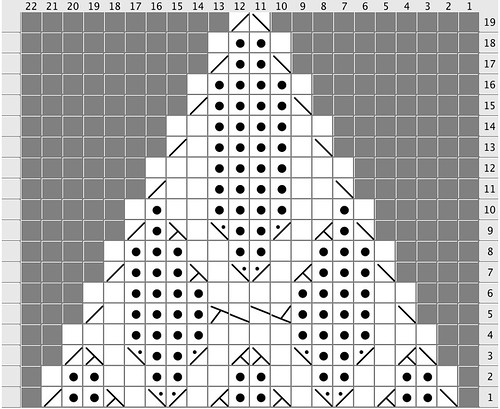
Charts
Legend
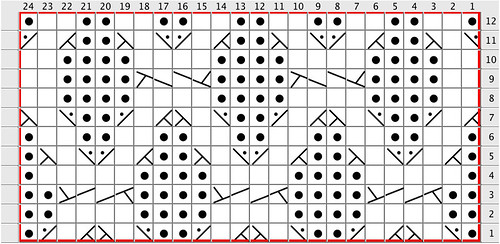
Right Hand
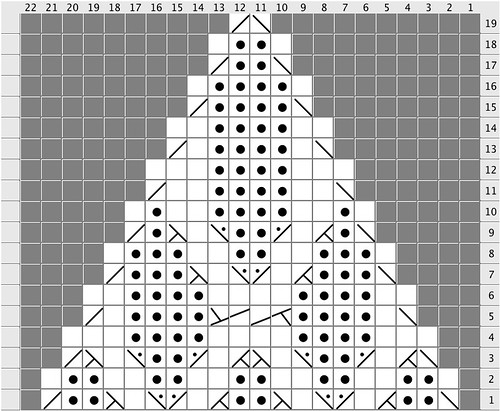
Right Tip
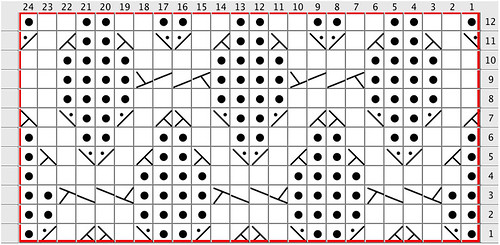
Left Hand
Left Tip
Right mitten
CO 44 sts. Join into the rnd, taking care not to twist, and pm.
Next 20 rnds: (P1, k2, p1) around.
Next rnd: Work rnd 1 of Right Hand chart across first 24 sts, pm, k to end of rnd.
Next 2 rnds: Work next rnd of Right Hand chart to marker, k to end of rnd.
Next rnd (inc rnd): Work in est patt to marker, M1R, k1, M1L, pm, k to end of rnd.
Rnds 1–2: Work in est patt to first marker, k to end of rnd.
Rnd 3: Work in est patt to first marker, sl marker, M1L, k to next marker, M1R, sl marker, k to end of rnd.
Repeat last 3 rnds until there are 13 sts between markers.
Next rnd: Work in est patt to first marker, sl marker, sl next 13 sts to scrap yarn, remove next marker, CO 1 st using the backwards loop method, k to end of rnd.
Next rnd: Work in est patt to first marker, k to end of rnd.
Cont as est until mitten measures 3"/7.6 cm above the thumbhole, or just covers the tip of the little finger when tried on, ending on rnd 10 of patt. At end of last rnd, remove marker after Right Hand patt and shift end-of-rnd marker 1 st to the left as foll: remove marker, k1, replace marker.
Setup rnd: Work rnd 1 of Right Tip chart across first 22 sts in rnd, pm, ssk, k to last 2 sts, k2tog. 4 sts decreased.
Rnd 1: Work next rnd of Right Tip chart to next marker, k to end of rnd.
Rnd 2: Work next rnd of Right Tip chart to next marker, ssk, k to last 2 sts, k2tog. 4 sts decreased.
Repeat rnds 1–2 until all charted rnds have been completed and 4 sts remain. Break yarn, thread it through rem sts, and fasten off.
Transfer 13 held thumb sts to needles. Join yarn at CO edge above thumbhole. Pick up and k 3 sts from CO edge, k13, pm. 16 sts.
K every rnd until thumb measures 2"/5 cm, or about 0.25"/0.5 cm shorter than desired finished length.
Next rnd: (K2, k2tog) around.
Next rnd: (K1, k2tog) around.
Next rnd: K2tog around.
Break yarn, thread it through rem sts, and fasten off.
Left mitten
CO 44 sts. Join into the rnd, taking care not to twist, and pm.
Next 20 rnds: (P1, k2, p1) around.
Next rnd: Work rnd 1 of Left Hand chart across first 24 sts, pm, k to end of rnd.
Next 2 rnds: Work next rnd of Left Hand chart to marker, k to end of rnd.
Next rnd (inc rnd): Work in est patt to marker, k to last st, pm, M1L, k1, M1R.
Rnds 1–2: Work in est patt to first marker, k to end of rnd.
Rnd 3: Work in est patt to last marker before end of rnd, sl marker, M1L, k to next marker, M1R.
Repeat last 3 rnds until there are 13 sts between markers.
Next rnd: Work in est patt to last marker in rnd, remove marker, sl next 13 sts to scrap yarn, CO 1 st using the backwards loop method.
Next rnd: Work in est patt to first marker, k to end of rnd.
Cont as est until mitten measures 3"/7.6 cm above the thumbhole, or just covers the tip of the little finger when tried on, ending on rnd 10 of patt. At end of last rnd, remove marker after Left Hand patt and shift end-of-rnd marker 1 st to the left as foll: remove marker, k1, replace marker.
Setup rnd: Work rnd 1 of Left Tip chart across first 22 sts in rnd, pm, ssk, k to last 2 sts, k2tog. 4 sts decreased.
Rnd 1: Work next rnd of Left Tip chart to next marker, k to end of rnd.
Rnd 2: Work next rnd of Left Tip chart to next marker, ssk, k to last 2 sts, k2tog. 4 sts decreased.
Repeat rnds 1–2 until all charted rnds have been completed and 4 sts remain. Break yarn, thread it through rem sts, and fasten off.
Transfer 13 held thumb sts to needles. Join yarn at CO edge above thumbhole. Pick up and k 3 sts from CO edge, k13, pm. 16 sts.
K every rnd until thumb measures 2"/5 cm, or about 0.25"/0.5 cm shorter than desired finished length.
Next rnd: (K2, k2tog) around.
Next rnd: (K1, k2tog) around.
Next rnd: K2tog around.
Break yarn, thread it through rem sts, and fasten off.
Finishing
Weave in all ends, but don't cut them off yet. Use the end at the base of each thumb to mend any holes in the area if necessary. Block mittens by soaking in lukewarm water, squeezing out excess water in a towel, and laying flat to dry. Pat the cuff ribbing into shape without stretching. When mittens are completely dry, cut off the woven-in ends and wear with glee.